Feminine Hygiene Dispenser
The Crustacean Menstruation Station
Overview:
As an introduction to engineering design, our team met with a client to design and construct an automatic feminine hygiene dispenser that would be free to use and easy to install and maintain in any campus bathroom. After meeting with our client, we came away with our given constraints. We then brainstormed ways to satisfy these constraints and began designing our dispenser.
| Objective | Constraint | Method |
|---|---|---|
| Dispense hygiene product Machine should dispense hygiene products when users request them | Machine must not dispense the entirety of its contents within a day | Machine dispenses a tampon when prompted |
| Theft deterrence Machine should safeguard against theft | Machine cannot collect user data | Machine will only dispense one product every three minutes to discourage theft |
| Cost Machine should be affordable to produce | Machine cost cannot exceed $400 | The target budget of the project is $100 per machine |
| Universal design Machine can be installed in any bathroom across campus | Machine must not protrude more than six inches from the wall | Machine will aim to be within the depth limit |
| Maintenance Machine should notify staff when its stock is nearly depleted | Machine must hold a week's worth of hygiene products | When machine is at approximately twenty-five percent capacity, it will notify the staff of the need to resupply |
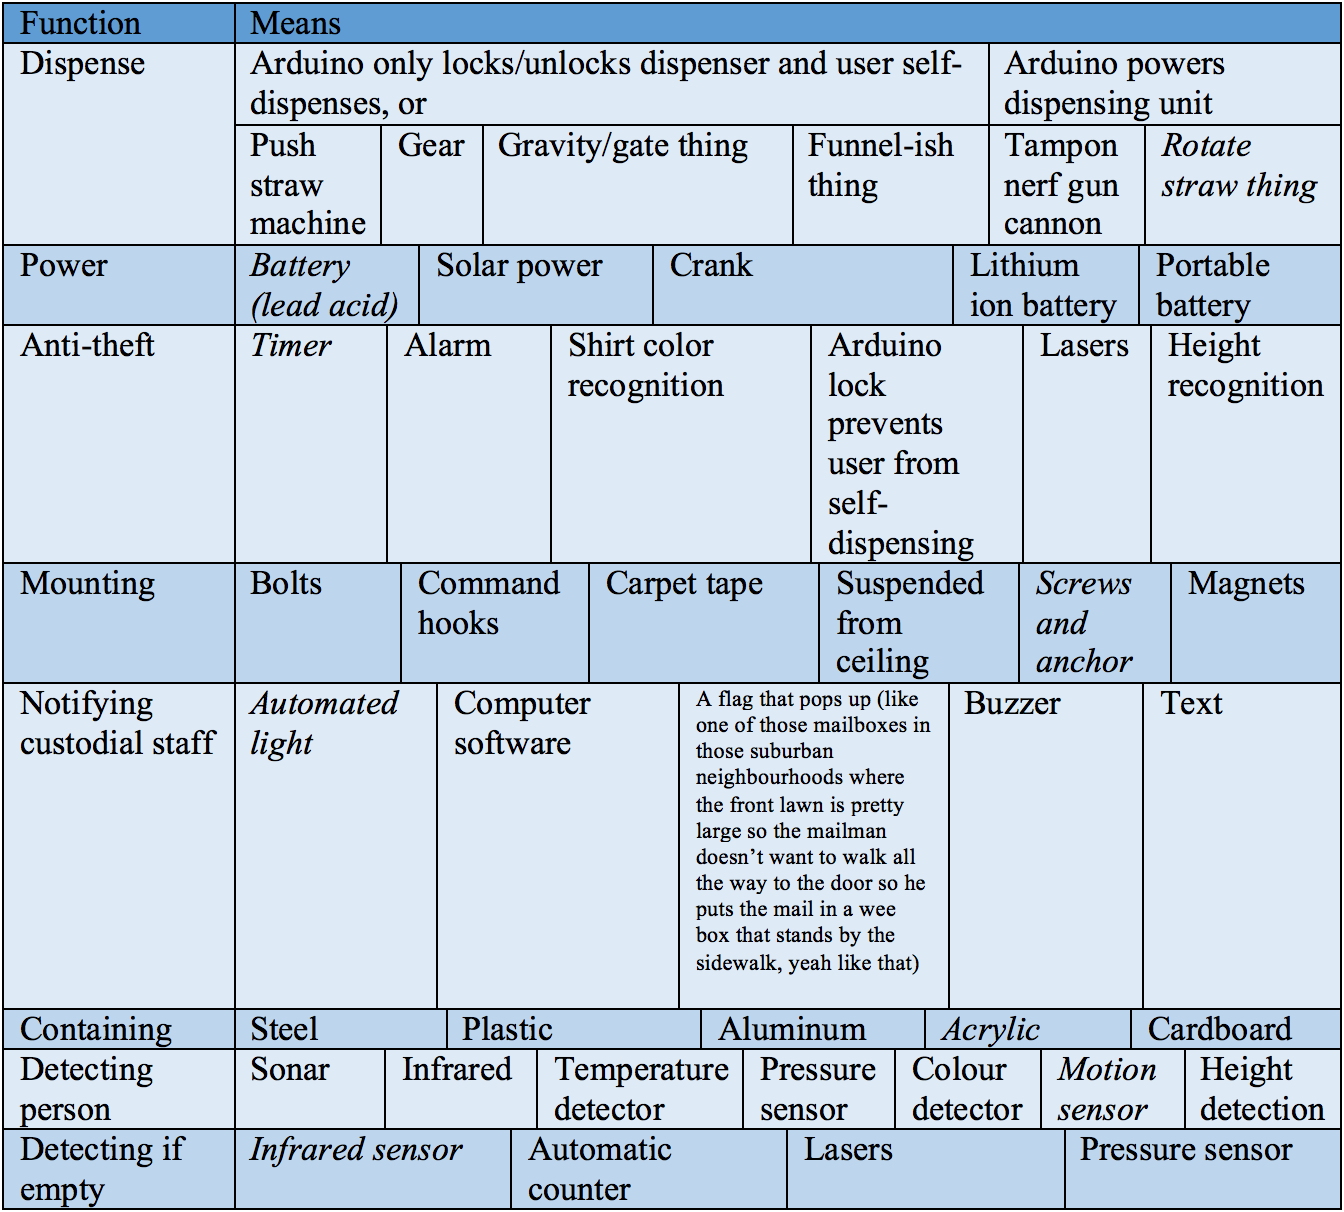
The selected means are italicized
For dispensing, our team went with our original idea to have a gear rotate a specified number of steps in the same direction each time to dispense a loaded product. This mechanism only required a stepper motor and a driver, and would load and dispense a product within a single motion. Since the motor and its driver would only be active when the product is dispensed, the two components would not require much battery, as seen below in the power budget analysis. The gear itself took a bit of designing, as we wanted each slot to only fit one tampon at a time, while also not holding the product too snugly. We also wanted the product to roll out easily when the gear was rotated 90º. After getting our sample products in, we were able to confirm our measurements and cut the shape out of an acrylic cylinder using a CNC and a manual milling machine. The barrel of the gear was then pressed onto a rod that attached to the wall opposite the door and connected to the motor mounted adjacent to the door.
One of the constraints presented by our client was for the dispenser to not rely on a wall outlet. For this reason, we decided to go with a battery to supply power to the electronic components. In order to keep our dispenser running for around a week’s worth of school days, we required a large, preferably rechargeable battery. For this reason, our group decided on a 12 volt, 3 amp lead acid battery. These batteries, commonly used in battery electric vehicles and for emergency backup power, are more resistant to battery life shortening circumstances, such as corrosion, overcharging, gassing, water usage, and self-discharge. They are also rechargeable, which would cut down on costs in the long run, as they could be rotated out with the unit’s stock.
To discourage theft and hoarding, we originally considered a way for users to input their id. However, in order to protect users’ privacy, we instead implemented a timer. Inspired by that of automatic paper towel dispensers, the device would only allow one product to be dispensed per minute. In order to obtain more than one product per bathroom visit, the user would have to wait around for several minutes, which most college students don’t have the luxury of doing. However, it is a reasonable enough wait time in that students that require feminine products won’t need to wait excessive periods of time for a product during peak hours. A 4 digit display was installed on the front of the machine to show users the remaining wait time until the next product could be dispensed. We also used a standard hasp and key-lock to prevent users from taking products, electronic components, or both! 😦
In order to be more accommodating to the female student body, our clients desired for the machine to be easily installable in a variety of public places, such as labs, classrooms, and bathrooms campus-wide. For this reason, we decided to go with a combination of screws and anchors. Since we were originally going to construct our device out of aluminum, we figured the container would be heavy enough on its own, and thus decided that a screws and anchors would be the safest way to go about installing our product. This way, our device could be easily installed on any wall. As it turned out, our final product ended up composing of mere adhesive’d acrylic sheets. Fortunately the screws ordered still worked, so long as we ensured there were anchors to go with them.
Though our original design was to keep the container transparent so that users could see how the device worked, we were advised to instead finish the exterior surfaces in order to make our product appear more professional. Since the staff responsible for refilling the machines would no longer be able to see inside, we relied on a an IR sensor, which would measure the distance from the top of the machine to the uppermost product, and in turn, would light an LED to notify staff of when the machine needed to be refilled.
We wanted the exterior of the machine to be sturdy and theft-proof, but not overly heavy or expensive. Though we originally considered aluminum to contain the device’s electronic parts and products, we later changed our designs to incorporate acrylic, as it was rust-resistant, lighter, and cheaper. Although more of the screws we ordered would no longer be of use and the additional cost of epoxy needed to be added to the bill of materials, the money saved purchasing acrylic helped to balance the prices out.
Detecting a person was tricky in that we wanted to try to avoid buttons. (Not only do they wear and tend to break, but the dispensers often wouldn’t be in particularly sanitary environments.) After browsing the Arduino website and narrowing our options down, we finally decided to go with the Grove touch sensor. This sensor changes its capacitance when a finger is within close proximity, effectively replacing press with touch. Although it still works when a finger comes in contact with the sensor surface, the option to instead hover one’s finger nearby reduces the spread of germs and wear on the surface of the sensor. This sensor was also cheaper than some alternatives.
Our original design was to use an ultrasound sensor to detect the level of stock, but the ultrasound sensor we ordered got mixed up with another team’s IR sensor. In spite of the mix up, the IR sensor ended up working great, as it would be able to sit on the top of the 22-inch-tall container and read the distance to the level of product, all the way down to the barrel. Depending on the distance, its reading would serve as the input used to light either a red (low stock) or a green (sufficient stock) LED.
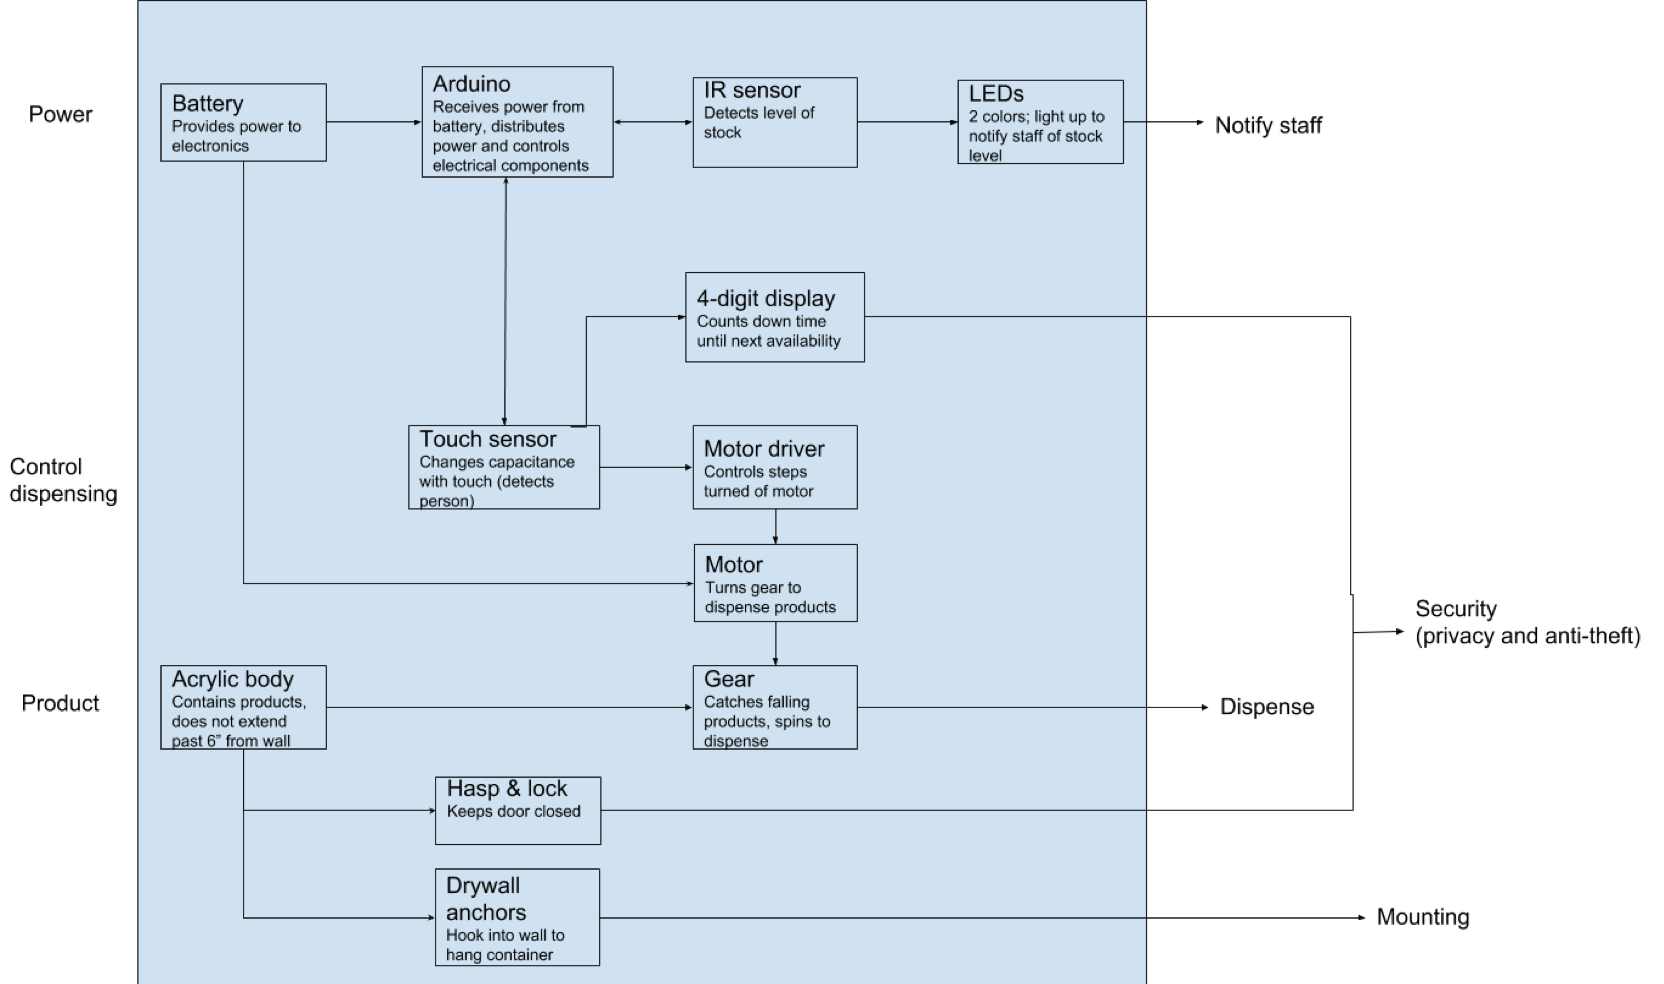
Overview of the product's layout and component functionalities
| Part | Supplier | Cost | Qty | Part No. |
|---|---|---|---|---|
| Elegoo UNO R3 | Amazon | $10.86 | 1 | EL-CB-001 |
| Grove touch sensor | Mouser | $3.90 | 1 | 713-101020037 |
| Stepperonline motor | Amazon | $10.99 | 1 | 17HS13-0404S1 |
| M-M jumpers | Adafruit | $1.95 | 1 | 1957 |
| M-F jumpers | Adafruit | $1.95 | 1 | 1954 |
| L293D Driver | Adafruit | $2.95 | 1 | 807 |
| LEDs | Sparkfun | $3.30 | 1 | COM-12062 |
| 4 digit display | Mouser | $9.95 | 1 | 485-878 |
| Acrylic sheet | Amazon | $59.99 | 1 | 1/8 24x48 |
| Loctite | Amazon | $8.37 | 1 | 1363118 |
| Padlock | McMaster | $4.18 | 1 | 1189A32 |
| Lockable Hasp | McMaster | $3.60 | 1 | 1546a5 |
| Screws | McMaster | $3.23 | 1 | 95616A153 |
| Acrylic stock | Amazon | $11.04 | 1 | PlasticRod216 |
| Battery | Amazon | $19.99 | 1 | ETX4L-BS |
| Hinges | McMaster | $3.76 | 4 | 11185A141 |
| Ultrasound sensor | Amazon | $5.20 | 1 | HC-SR04 |
| Breadboard | Digikey | $8.97 | 3 | FIT0008 |
| Motor mount | Amazon | $8.29 | 1 | 041590 |
| Motor coupling | Amazon | $2.99 | 1 | 44465SI |
| TOTAL | $185.46 |
Mathematical Analysis:
Our analysis of the mechanical and electrical components of our project were recorded to determine the strength and power necessary for the product to operate as projected.
The battery amperage was 3A, its voltage was 12V, and its power was 48Wh. The estimated "on-time" of the device was 16 hours per day.
The LEDs, resistors, jumper cables, screws, solder, and hinges were excluded from the mechanical analysis.
| Component | Amperage | Voltage | Power | Time Used (hr/day) | Watt Hours |
|---|---|---|---|---|---|
| Arduino | 0.0004 | 5.0 | 0.002 | 16 | 0.032 |
| Touch sensor power | 0.05 | 3.3 | 0.165 | 16 | 2.64 |
| Touch sensor IO | 0.02 | 2.0 | 0.04 | 16 | 0.64 |
| IR sensor power | 0.05 | 5.0 | 0.25 | 16 | 4.0 |
| IR sensor IO | 0.02 | 2.0 | 0.04 | 16 | 0.64 |
| Motor driver | 0.6 | 2.6 | 1.56 | 0.02 | 0.0312 |
| LEDs | 0.05 | 3.3 | 0.165 | 16 | 2.64 |
| Display | 0.05 | 3.3 | 0.165 | 16 | 2.64 |
| Motor | 0.4 | 9.4 | 3.76 | 0.02 | 0.0752 |
| Total power: | 6.147 | 13.3384 |
| Component | Weight | Quantity | Additional Notes |
|---|---|---|---|
| Arduino | 25 | 1 | w/o plastic base |
| Touch sensor | 4 | 1 | |
| IR sensor | 6 | 1 | |
| Motor | 224 | 1 | |
| Driver | 23 | 1 | |
| Display | 7 | 1 | |
| Lock | 8 | 1 | estimated |
| Hasp | 22 | 1 | estimated |
| Battery | 1319.954 | 1 | w/o plastic base |
| Cylinder | 557.918 | 1 | raw stock |
| Body | 1306.62 | 1 | w/o plastic base |
| TOTAL | 3503.492 | ||
| 34.369 (N) | 7.726 weight (lbf) |
Final Design:
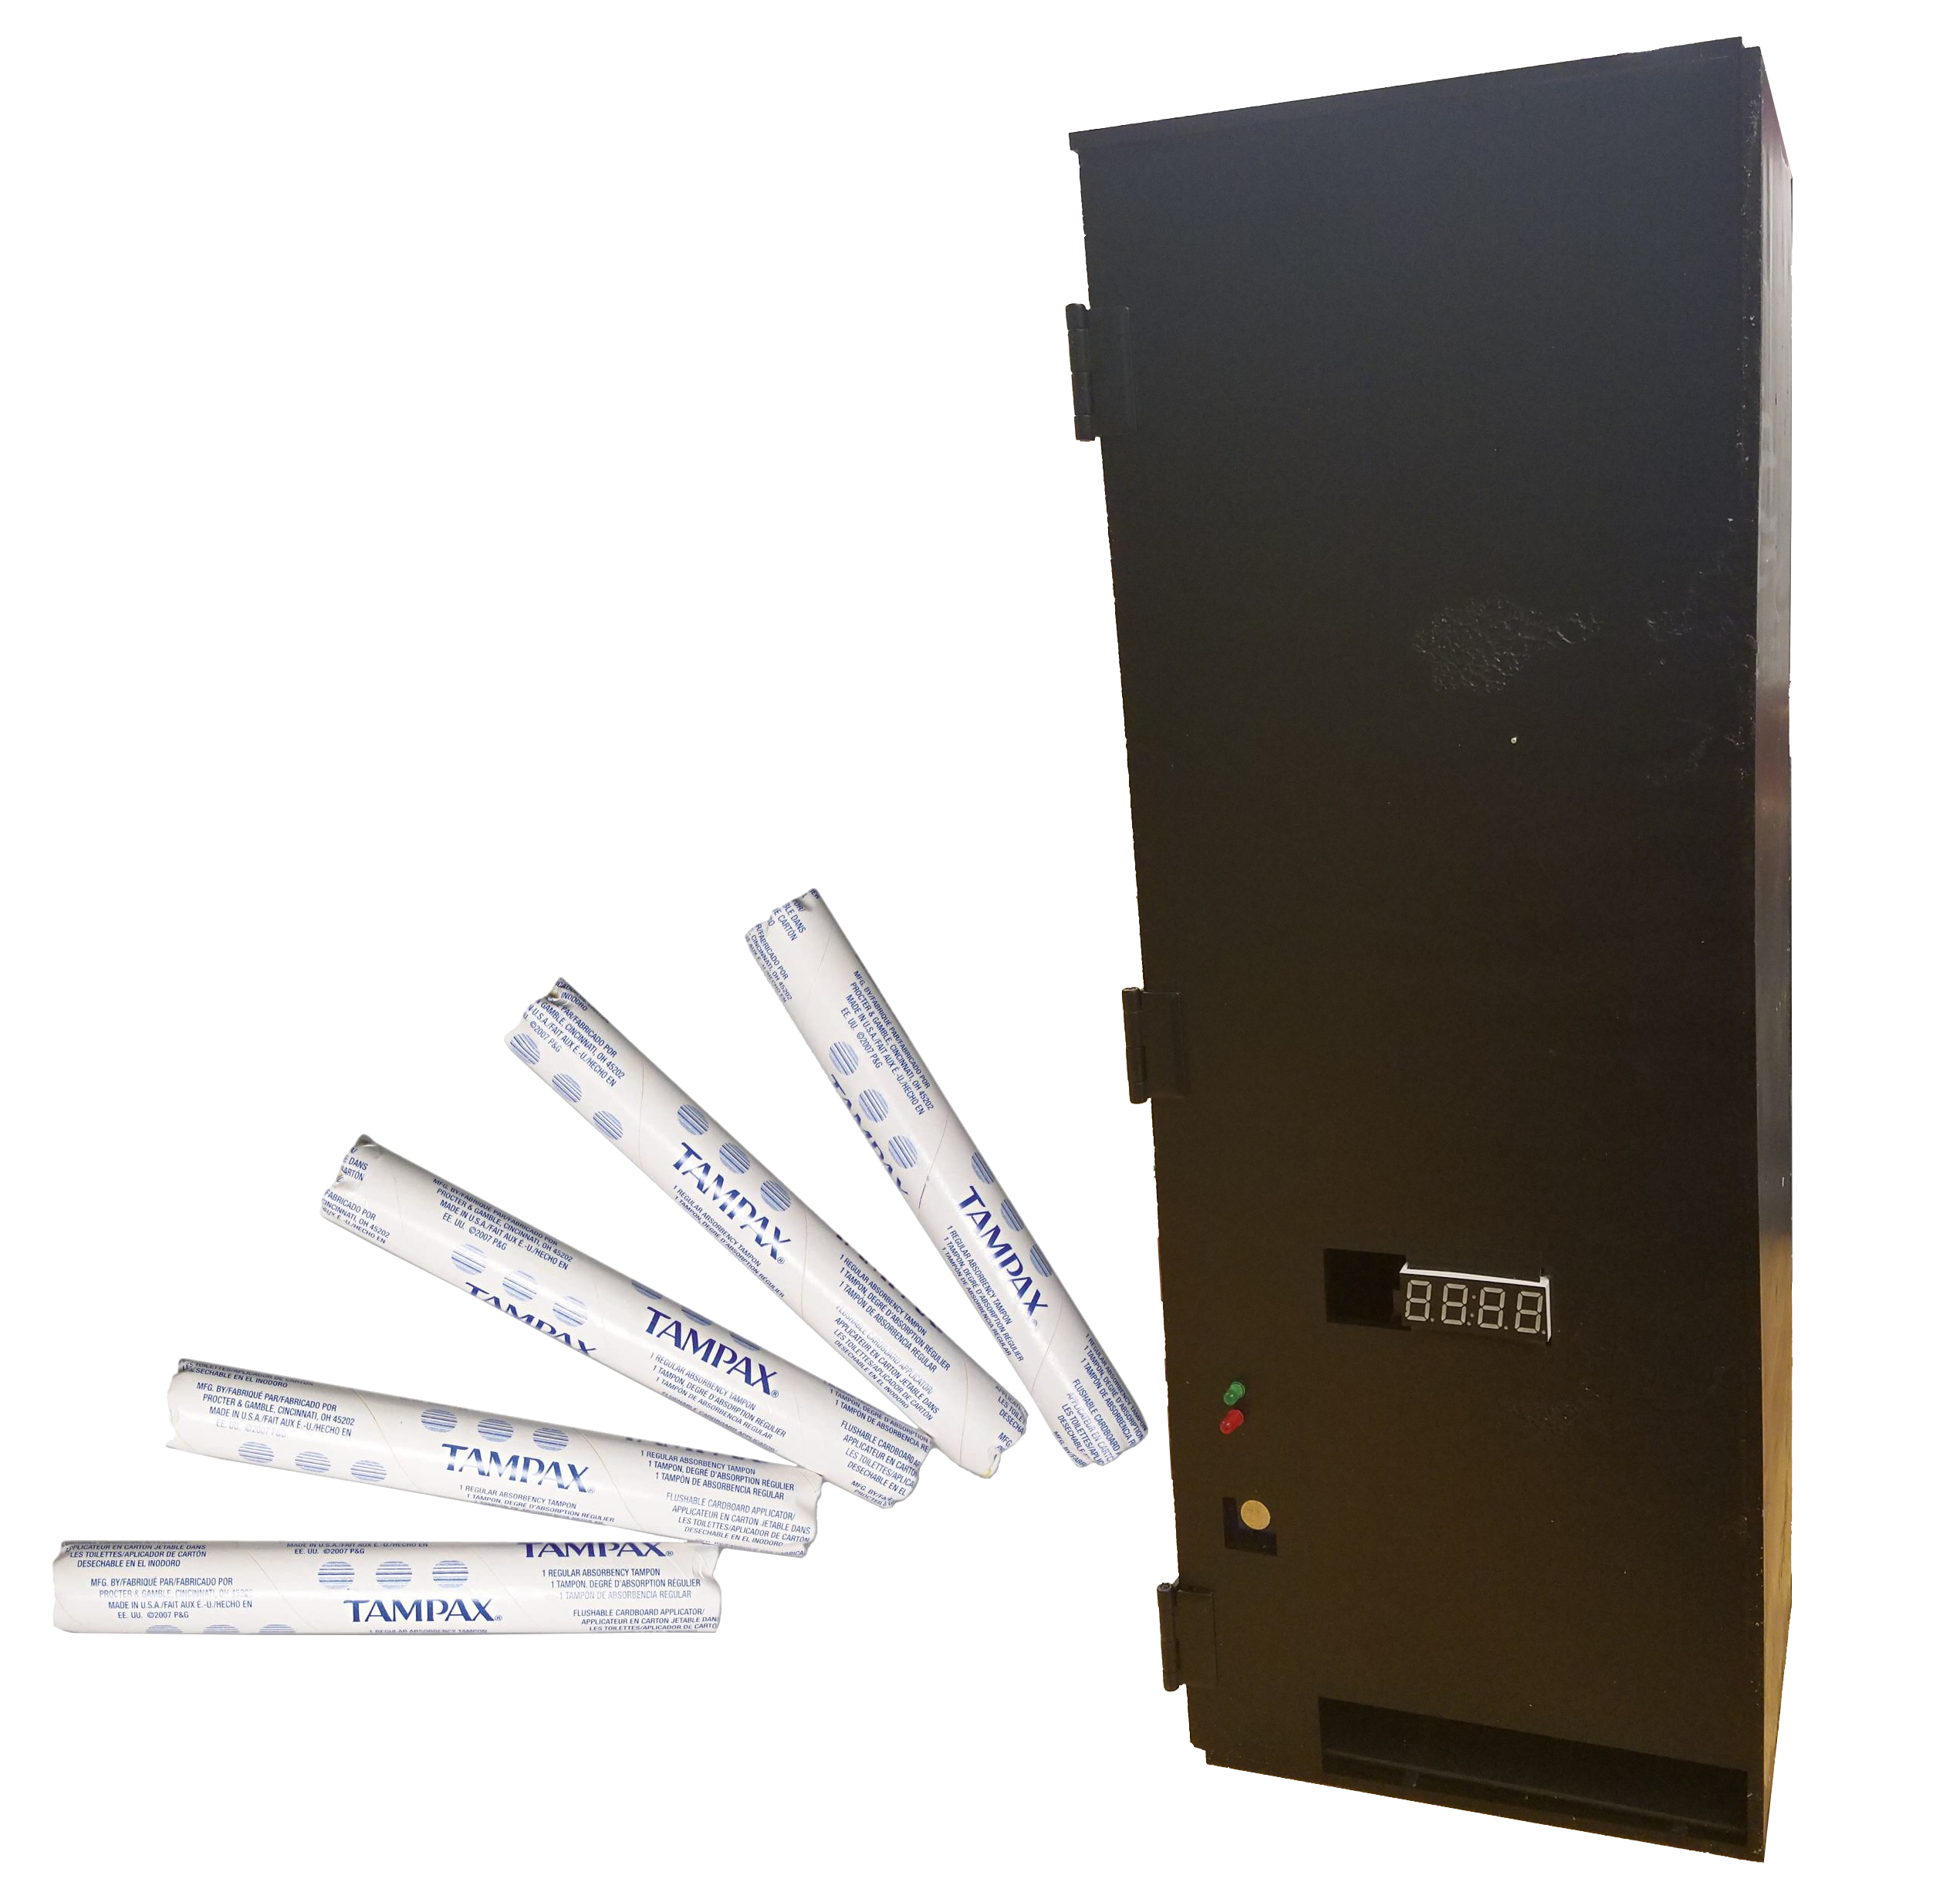
After confirming that our designs would hold up as expected, we were ready to bring our idea to life. Shown below are the final technical drawings of the exterior, interior, and custom barrel of the dispenser that we used to machine the main housing and dispensing unit of the device. Note that the hole callouts were approximated, as the screws used in the final prototype were not available at the time of designing. Also included below is the final functional analysis of the unit.
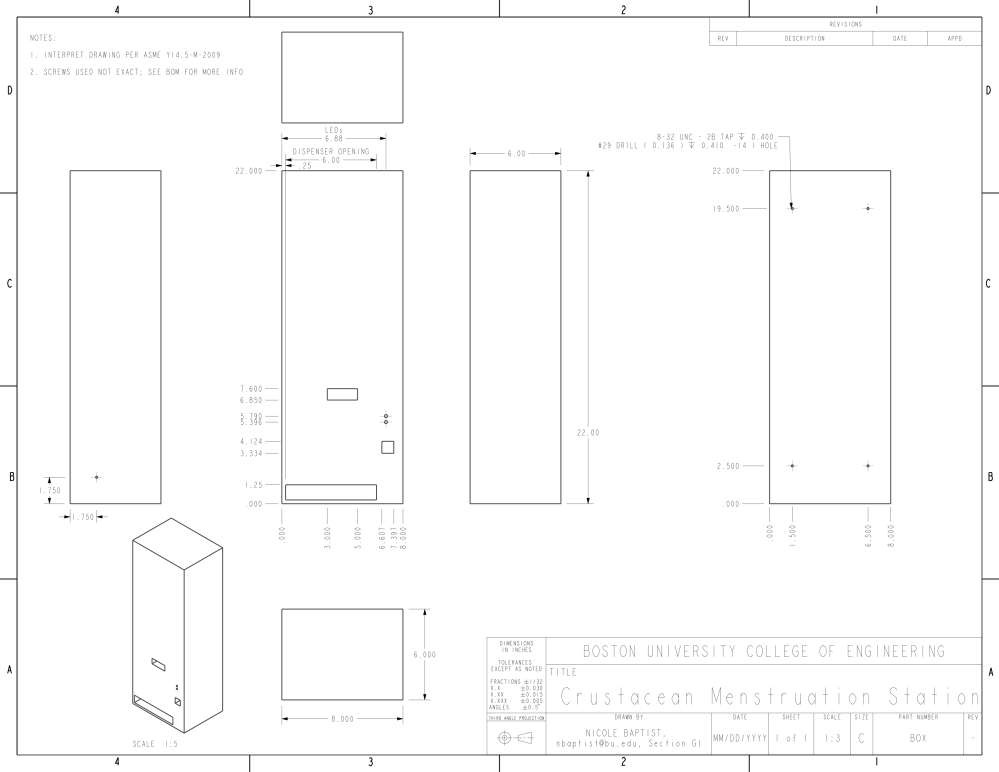
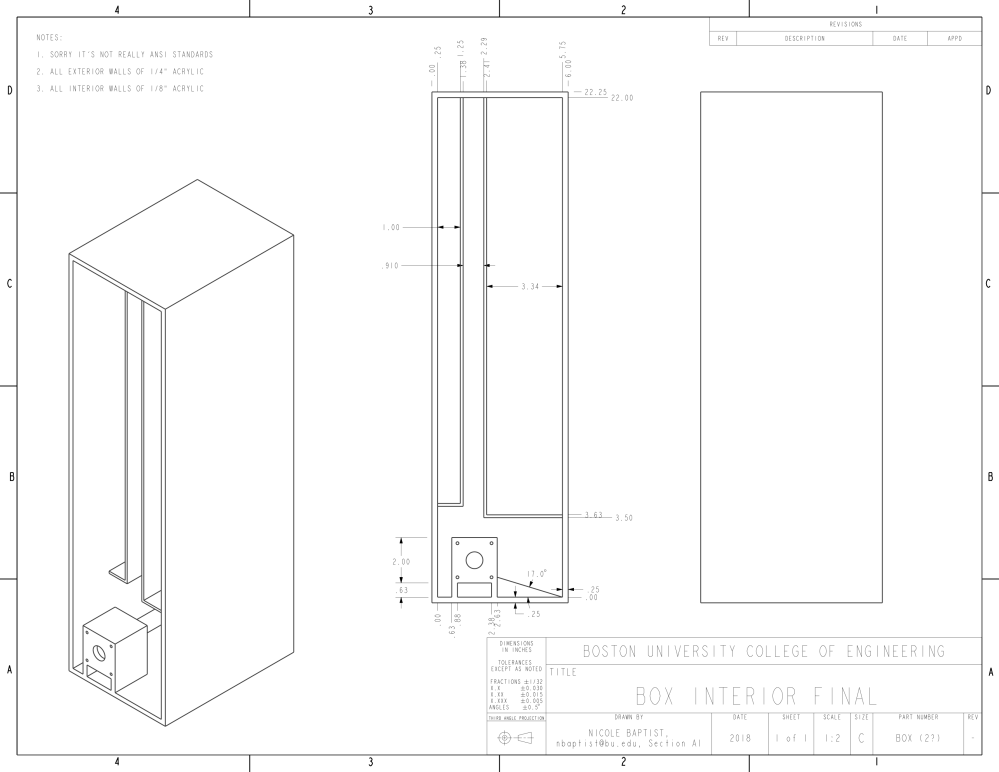
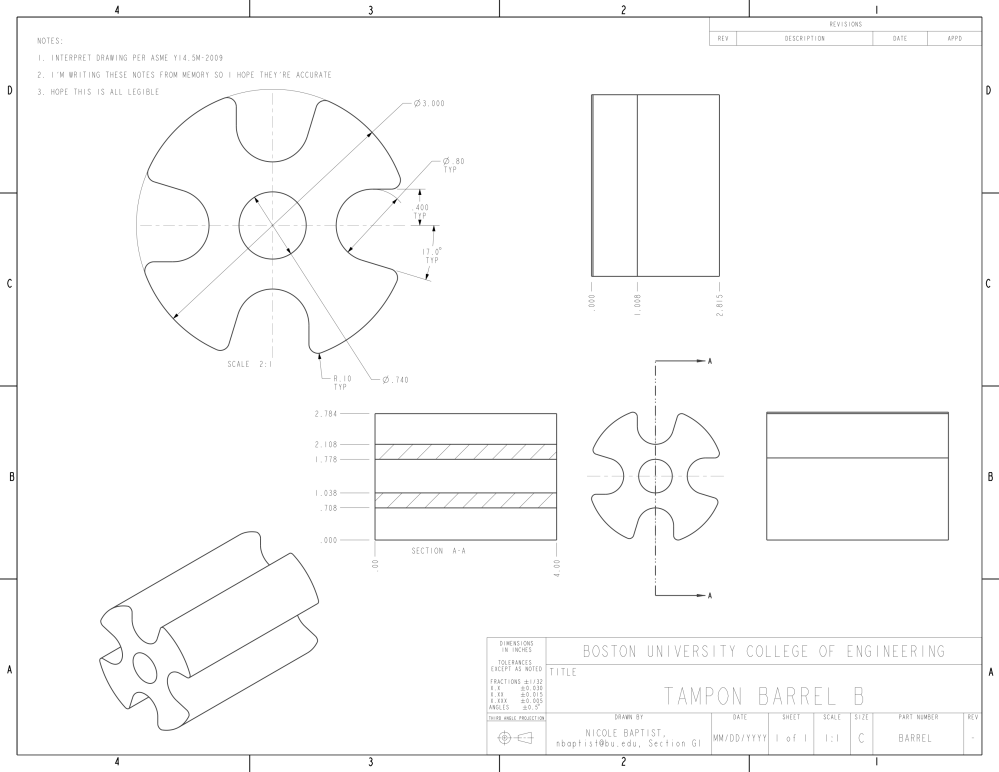
Drawings of the project's hardware
(please click images to expand)
Though the actual container did require more thought than originally anticipated to incorporate all functions while simultaneously heeding all constraints, so did the shape of the barrel itself. It was designed specifically for dispenser-friendly tampons that came in a cardboard shell for ease of dispense. However, this additional wrapper made the diameter of each product larger, and thus specific measurements were required (instead of our original plan to research average tampon diameters online). Similarly, since it was to be mounted on a stepper motor, the design took into account the fact that the motor would only turn 90º per user request, and thus the product needed to be able to roll out of the notch on its own. For this reason, the front lip of each notch is slanted slightly (by 17º) so that when the motor stops rotating, the product can still easily roll out.
Results:
Although we ran into a few challenges along the way, our team was able to produce a solid prototype that fully exemplified seven of eight functions. Although we hoped to further improve our design with more time, material, and experience, our prototype turned out quite alright. The only issue that we ran into was the friction between individual products. Due to the weight of over 200 tampons being funneled through a trough-like shape, after a few dispenses, they would become stuck and the machine would need to be shaken to unsettle them.